
Thanks for dropping in! It's our very last day and we hope you've enjoyed your hopping. Make sure you leave a comment on all the blogs to be eligible for a prize. There is more information below.
Here is my contribution to the blog hop:

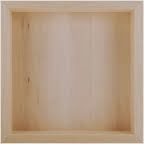 I've had this Walnut Hollow Basswood Canvas for some time. It finally told me what it wanted to be!
The basswood canvases are just like regular deep canvases, except they're all wood. When you flip them over, they are like a shadowbox, or - keep flipping - a container....
I think I've been hanging around in the "wrong" magazines lately and I was after a shabby chic look. This is what ultimately happened.

Here are the supplies you will need for this project (thumbnail links for Quietfire products are below):
- Walnut Hollow Basswood Canvas 6x6" Item 29619
- Ranger Tim Holtz Distress Paints in Bundled Sage, Stormy Sky and Picket Fence.
- Tim Holtz Foundations Box Corners
- Sand paper
- Quietfire Design Rubber stamps: The Longest Journey, I Wouldn't Have Missed Being Your Friend, To Create and Don't Let Yesterday
- Distress Ink Pads in Stormy Sky and Bundled Sage
- Glue Dots, Pop Dots and Double-sided Tape
- Spellbinders Grand Calibur, Labels 22 and Foliage 2
- Ranger Distress Cardstock in Bundled Sage and Stormy Sky
- Ranger Specialty Stamping Paper

Instructions:
- Paint Basswood Canvas with Stormy Sky Distress Paint. Allow to Dry. Using Bundled Sage paint the second layer and allow it to dry. Don't worry about perfect coverage. We're going for the shabby look in this project. Use Picket Fence to paint the final top coat and allow to dry overnight.
- Use Picket Fence Distress Paint to intermittently cover the Foundation Box Corners. Allow to dry.
- Sand the painted surfaces with 120 grit sandpaper and wipe with a damp cloth.
- Use Stormy Sky Distress Ink to stamp the sentiments all the way around the base as shown in the accompanying photographs. (Bundled Sage is a bit too pale) Normally I would go with an ink that shows more detail in the fine lines of the lettering, but I'm staying with the shabby look for this project, so Distress Ink is perfect.
- To create the sentiment label, use Stormy Sky Distress Ink to stamp "I Wouldn't Have Missed Being Your Friend" on Specialty Stamping Paper and when dry, die cut with Labels 20. Sponge around the edges with Stormy Sky and Bundled Sage Distress Ink. I wanted a border, but the next size label was much bigger. Too big. So I asked myself "What would Becca Feeken do?" Well, I'm not sure she would have done this, but it comforted me somehow and allowed me to charge ahead.... Cut two Labels 20 from Stormy Sky Cardstock. Use Glue Dots to attach the one coloured label to the back of the sentiment label so there is a small border showing at the top. Use more Glue Dots to attach the second coloured diecut so there is a small border showing to the bottom of the sentiment label. See photos below.
- Die cut two leaf flourishes, as shown, from Foliage 2.
- Use Pop Dots to adhere the sentiment label to the box and Glue Dots to adhere the leaf flourishes to the base and the label.
- Use Glue Dots or Double-Sided Tape to adhere the Foundation Box Corners to each corner of the Basswood Canvas to create a container. There are small screw holes on the underside of the Box Corners should you wish to use them.
- Add floral container and flowers.


Make sure you leave a comment below to be eligible for a prize and you must visit Wanda's blog today, too!
There is still time to go back to all the blogs and leave comments before midnight tonight.
And make sure to link a piece of your "love-ly" artwork to our Queen of Heart blog post on Quietfire Creations at this link: http://quietfirecreations.blogspot.ca/2014/02/welcome-to-queen-of-hearts-blog-hop-and.html before midnight tonight.
Thanks so much for visiting and playing along!

Feb 10 - Holly and
Teresa - setting the bar!
Feb 11- Sherry and Jutta
Feb 12 - Wendy and Terre
Feb 13 - Yogi and Robyn
Feb 14 - Suzanne (you are here) and Wanda
For a chance to win…. Leave a comment below before midnight PST February 14, 2014. A winner will be randomly chosen from my list of comments and your name will be posted on February 15, 2014. For more details AND to enter in the Queen of Hearts Challenge, please visit http://quietfirecreations.blogspot.ca/
Now leave a comment! Good luck!
Here are the thumbnail links to the Quietfire products used in this project:


Great use of a 'canvas'! Who'd have guessed it should be hanging on a wall :)
ReplyDeleteWhat a fantastic project! And such a lovely foil for the hydrangea, too! JW
ReplyDeleteI love this, beautiful box, the stamped wording is wonderful, but the box itself is great, I would love this to put just about anything in. I will be looking for this canvas, I never knew they existed. Thanks and I love the flowers!
ReplyDeleteHow beautiful! Love the sentiments stamped on the box and the beautiful colors! So glad that canvas finally told you what it wanted to be!!
ReplyDeleteEileen L. said...
ReplyDeleteWhat a beautiful table centerpiece. Love the sentiments and your box is lovely.
I love when I have something and it tells me what it needs to be. it's so much easier. can you come to my house and have a listen. ok joking aside, this is such a cute piece and I love how you used it.
ReplyDeleteLove this, Suzanne! How very clever AND beautiful. Awesome sentiment too!
ReplyDeleteLove this centerpiece project and tutorial!! Happy Valentine's Day!
ReplyDeleteWow this is stunning! It is so lovely!!!! Super tutorial, thank you!
ReplyDeleteThis is just a beautiful project! I can see myself
ReplyDeletedoing something like this in the future. I love all
the stamps and the beautiful way it looks.
Great work!!
Wow, now this is thinking outside of the box for sure! LOL! Great use of paint, color, design. Thank you so very much for giving us the permission to go-for-it, Suzanne!
ReplyDeleteSo beautiful! And it would make a great addition to any home. Thanks to you and all the other design team members for a great blog hop.
ReplyDeleteI don't know where I have been but I did not know my beloved TH inks also came in a paint! I have numerous wood surfaces in storage from my tole painting days that I predict will soon see the light of day thanks to your blog and wonderful creation.
ReplyDeleteWhat a beautiful design! Love what you've accomplished.
ReplyDeleteAbsolutely love this , what a great idea, and a lovely gift!
ReplyDeleteWhat a delightful project. Love your lateral thinking - not just a canvas!!! It is beautiful. Christine
ReplyDeleteoh this is a great project. Hadn't realized those basswood canvasses were all wood. Duh!!
ReplyDeletePlease don't tell me you picked this flower at this time of year - I'll be really jealous. Sheesh.
Have a great day and Happy Valentine's.
What a beautiful project! I just love the sentiments stamped on wood! Beautiful sentiments.
ReplyDeleteA lovely gift but I would love it for my table. Thank you for sharing you're great ideas.
Happy Valentines Day!
I absolutely love your project. I would love to have this sitting on my dining room table. Thank you for sharing this great idea.
ReplyDeleteHappy Valentines Day!
ReplyDeleteThis is such a wonderful and unexpected use of a frame. It's beautiful, full of the romantic charm of a bygone era. :)
Absolutely beautiful- love everything about this project.
ReplyDeleteThis has been a fabulous blog hop!
That is a beautiful creation!!
ReplyDeleteThis comment has been removed by the author.
ReplyDeleteWow, just wow. I love Tim Holtz products, and I love how you used them here... And yeah, I WANT that stamp!!! :)
ReplyDeleteOh my gosh Suzanne. I love this. I want this. I have to make this. You did such an awesome job. You found the blue hydrangea too.... so happy that you did. Thanks so much for always inspiring me. You are so talented.
ReplyDeleteThat is a gorgeous box, Suzanne. Perfect for the centerpiece. Love the colors and the sentiments!
ReplyDeleteWhat a truly gorgeous box. What a great tribute to a friend. Someone will be lucky to receive this item.
ReplyDeleteI don't usually say this, but, I don't think I could ever make that! It is absolutely gorgeous and amazing!
ReplyDeleteOh my gosh, this is amazing. What a wonderful way to display floral arrangements and the one you chose works perfectly!
ReplyDeleteI love this - and hydrangeas are my favorite. I've not seen this kind of canvas box before, and so now I'm adding One. More. Thing. To. Add. To. My. Stash. Thanks!
ReplyDeleteJust beautiful Suzanne, love the soft colours and the sentiment you are so talented. I am challenging myself this year to think outside the box and make something other than cards and you have just inspired me to get cracking.
ReplyDeleteYour centerpiece is lovely. I love how the hydrangea compliments the blues you chose for the stamped images. Happy Valentine's Day!
ReplyDeleteOh my, this is just beautful! Love the flowers as well. Perfect project!
ReplyDeleteWhat a lovely project!
ReplyDeleteSuzanne: All I can say if WOW. What a keepsake. Carmen G.
ReplyDeleteThat is an amazing piece of art Suzanne. To say it's gorgeous is a HUGE understatement.
ReplyDeleteOMGosh what a piece of art!
ReplyDeleteThis is so pretty... What a neat thing to make for a gift to give with the flowers :)
ReplyDeleteBeautiful base for your flowers!!!
ReplyDeleteJan
That is amazing, I just love it and versitile. The colors are great and flowers to match. Just awesome, Thank you for sharing!!!!
ReplyDeleteThis is gorgeous and so clever. Love the sentiments stamped on the side. Great job!
ReplyDeleteWow-what a gorgeous project. Thanks for sharing
ReplyDeleteI love this piece! It is gorgeous, I also want to thank you for the tutorial. TFS.
ReplyDeleteWhat a beautiful box and idea! TFS!
ReplyDeleteWhat an interesting way to use that canvas! Very unique design and I really love that sentiment.
ReplyDelete